Here's a sneak preview of the Diablo III Barbarian Tier 5 armor I am building. All of these pieces were made using a thermoplastic called Worbla.
One reason you might use Worbla instead of Wonderflex to create your cosplay armor is in the unique ways that you can manipulate Worbla.
Here's how I create a embossed look on Worbla armor. This technique is more cost-effective than layering extra Worbla on top. Instead, you are layering your less-expensive (and easier-to-cut) craft foam.
You need:
Sheets of craft foam (in two contrasting colors)
Heat Gun
A pointy wooden tool
Sharpie for drawing your design
Good scissors
Elmer’s glue
A surface to work on that the Worbla will not stick to (I use a piece of glass shelving from IKEA)
First, cut out your design in craft foam and glue it to your craft foam pattern piece. Then layer Worbla over the craft foam and use a pointed wooden tool to press the thermoplastic down around the edges of the design. Let’s see an example:
 |
| This is going to be a plate that wraps around the outside of my upper arm. |
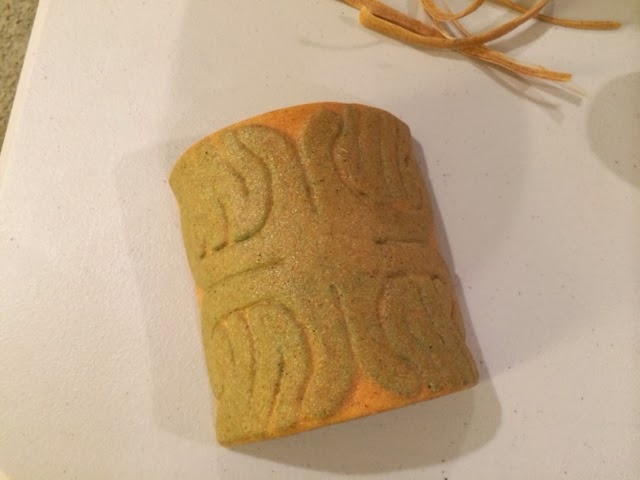
Here I layered my design in green foam over yellow. The yellow will become my pattern piece for an upper-arm plate.
First I heated a piece of Worbla, then stuck the pattern piece on it with the green design side against the shiny side of the Worbla sheet.

Then I flipped it over.
Here you can see that it helps to use contrasting craft foam colors because you can see the darker green design through the plastic.
Next, I used the pointy tool to press the heated Worbla down around the design shapes and get nice, smooth edges.
The Worbla cools and hardens pretty quickly so I heated and worked on one quadrant of the piece at a time.
After finishing the relief, I heated a second piece of Worbla and stuck it to the back of the craft foam. Then I pressed the edges together to seal in the craft foam (sandwich!) and trimmed the excess.
Save your Worbla scraps, you can heat them up and use them for decorations, like claws and scrollwork!

Lastly I heated up the whole piece and curve it into shape around my upper arm, then let it cool.
Here is the completed piece after adding the spike and painting it.
In this last image you can see the hand plate on which I used both the craft foam relief technique and also layered strips of Worbla for the edge details. Here it is easy to see the visual difference you get – with the relief technique you will have smooth, rounded edges, and with the layering technique you will have sharp edges., which looks great for border outlines.
Did you know? Worbla (or "Worbla's Finest Art") is made from renewable natural raw materials is also known as Rhenoflex RX 5050 which was originally engineered by a German company for the purpose of industrial shoe-making. You can buy it in the U.S. from cosplaysupplies.com or yayahan.com


